Snippet
Ansible
Filter Plug
- Filter를 이용하여 데이터 유형 및 형식을 변환하거나, 수학 계산, 문자열 분할 및 조합 등의 작업을 할 수 있습니다.
- Ansible은 Jinja2와 함께 제공되는 표준 필터 및 특수 Plugin을 제공합니다.
- 사용자가 만들 수도 있으며, Playbook과 동일한 경로에 위치한
filter_plugins디렉토리 혹은 Role에 추가할 수 있습니다.
DEFAULT_FILTER_PLUGIN_PATH
Description : separated paths in which Ansible will search for Jinja2 Filter Plugins.
Type : pathspec
Default : ~/.ansible/plugins/filter:/usr/share/ansible/plugins/filter
Ini : Section [defaults]
Key : filter_plugins
Environment Variable : ANSIBLE_FILTER_PLUGINS
- Manage Node에서 NFS로 연결된 마운트 정보를 추출하는 예제입니다.
ansible_mountsFacts를 조회하면fstype을 통해 파일 시스템 유형을 확인할 수 있습니다.
"ansible_mounts": [ { "uuid": "N/A", "mount": "/home/d3/cdn", "device": "100.100.100.10:/vol/vol1/cdn", "fstype": "nfs", "options": "rw,addr=100.100.100.10", "block_size": 65536, "block_used": 662633924, "inode_used": 209145355, "size_total": 54423044620288, "block_total": 830429758, "inode_total": 279999986, "size_available": 10996667777024, "block_available": 167795834, "inode_available": 70854631 }, { "uuid": "ae7fca20-2285-4161-91ff-8f50bb4cd301", "mount": "/var", "device": "/dev/sda5", "fstype": "ext4", "options": "rw", "block_size": 4096, "block_used": 717974, "inode_used": 85956, "size_total": 15481577472, "block_total": 3779682, "inode_total": 960992, "size_available": 12540755968, "block_available": 3061708, "inode_available": 875036 }, { "uuid": "782e10a3-65a6-461d-8c6d-b1a613c4b487", "mount": "/home", "device": "/dev/sda6", "fstype": "ext4", "options": "rw", "block_size": 4096, "block_used": 7224943, "inode_used": 71375, "size_total": 116594974720, "block_total": 28465570, "inode_total": 7233536, "size_available": 87001608192, "block_available": 21240627, "inode_available": 7162161 }, { "uuid": "2c7d9334-4beb-4f44-b060-9627d541ed17", "mount": "/boot", "device": "/dev/sda1", "fstype": "ext4", "options": "rw", "block_size": 1024, "block_used": 50957, "inode_used": 44, "size_total": 101529600, "block_total": 99150, "inode_total": 25688, "size_available": 49349632, "block_available": 48193, "inode_available": 25644 }, { "uuid": "N/A", "mount": "/home/d3/www/uploads", "device": "100.100.100.10:/vol/vol1/www/uploads/", "fstype": "nfs", "options": "rw,addr=100.100.100.10", "block_size": 65536, "block_used": 662633924, "inode_used": 209145355, "size_total": 54423044620288, "block_total": 830429758, "inode_total": 279999986, "size_available": 10996667777024, "block_available": 167795834, "inode_available": 70854631 }, { "uuid": "d0098bdc-2cb5-4c72-b988-d198c59775ae", "mount": "/", "device": "/dev/sda2", "fstype": "ext4", "options": "rw", "block_size": 4096, "block_used": 5310994, "inode_used": 198038, "size_total": 154818260992, "block_total": 37797427, "inode_total": 9601024, "size_available": 133064429568, "block_available": 32486433, "inode_available": 9402986 } ],- Playbook에는
ansible_mountsFacts 아래fstype중nfs와 일치하는 속성을 지정합니다. mapattributesFilter 를 이용하여device와mount속성도 함께 출력합니다.- name: LINIX-00 | Using Ansible Facts (mount) local_action: lineinfile path={{ file_path }} line="{{ inventory_hostname }} {{ ansible_host }} {{ ansible_mounts | selectattr('fstype', 'equalto', 'nfs') | mapattributes([ 'device', 'mount']) }}" when: - ansible_facts['system'] == "Linux" - ansible_mounts | selectattr('fstype', 'equalto', 'nfs') | list | length !=0- 출력 결과를 확인하면 조건에 맞는 여러 속성을 출력하는 것을 확인할 수 있습니다.
"line": "test01.d3.node 100.100.100.20 [{'device': '100.100.100.10:/vol/vol1/cdn', 'mount': '/home/d3/cdn'}, {'device': '100.100.100.10:/vol/vol1/www/uploads/', 'mount': '/home/d3/www/uploads'}]" - Python 코드는
filter_plugins/mapattributes.py경로에 생성한 Filter Plugin 입니다.#!/usr/bin/env python class FilterModule(object): def filters(self): return { 'mapattributes': self.mapattributes } def mapattributes(self, list_of_dicts, list_of_keys): d = [] for di in list_of_dicts: newdi = { } for key in list_of_keys: newdi[key] = di[key] d.append(newdi) return d
Collecting MAC Addresses
- Manage Node에 모든 할당된 물리/가상 인터페이스 MAC주소를 기록합니다.
ansible_interfacesFacts에서 주의해야할 점은 인터페이스 이름에서-Hypen을_Underscore로 변경해주어야합니다.- 이유는 인터페이스의 MAC 주소를 확인할 수 있는 Facts는
ansible_facts[INTERFACE_NAME]['macaddress']인데, 만약 인터페이스 이름이ifcfg-eth0이라면 Facts는ansible_facts['ifcfg_eth0']['macaddress']입니다. 결과적으로ifcfg-eth0이 아닌ifcfg_eth0형식으로 조회해야합니다.- name: Collecting MAC Addresses local_action: lineinfile path=/var/lib/awx/projects/cmdb/templates/mac_info1.txt line="{{ item }} {{ ansible_facts[item]['macaddress'] | default('N/A') | replace(':', '') }} {{ ansible_facts.nodename}} {{ ansible_facts.default_ipv4.address }}" with_items: - "{{ ansible_interfaces | replace('-', '_') }}" - Ansible 공식 F&Q에서도 비슷한 예를 소개하고 있습니다.
How do I access a variable name programmatically?
An example may come up where we need to get the ipv4 address of an arbitrary interface, where the interface to be used may be supplied via a role parameter or other input. Variable names can be built by adding strings together using “~”, like so:
{{ hostvars[inventory_hostname]['ansible_' ~ which_interface]['ipv4']['address'] }}
In the example above, if your interface names have dashes, you must replace them with underscores:
{{ hostvars[inventory_hostname]['ansible_' ~ which_interface | replace('_', '-') ]['ipv4']['address'] }}
Using REST API
- AWX는 OAuth2와 Basic Auth + Token 방식의 인증을 제공합니다.
POST /api/v2/token을 이용한 기본 인증을 통하여 token 정보를 수령할 수 있습니다.curl -i -u <username>:<password> -X POST http://awx.d3.com/api/v2/tokens/- 이후 모든 Header에는 Bearer Token 을 Header에 추가하여 통신할 수 있습니다.
curl -i -X GET -H "Content-Type: application/json" -H "Authorization: Bearer [TOKEN]" http://awx.d3.com/api/v2/hosts/ - 아래 예제는 Python을 이용하여 Workflow를 실행하는 내용입니다.
#!/usr/bin/env python import sys import requests from requests.auth import HTTPBasicAuth try: env=sys.argv[1] if env=="dev": res = requests.post('http://awx.d3.'+env+'.com/api/v2/workflow_job_templates/40/launch/', verify=False, headers={'Content-Type': 'application/json','Authorization': 'Bearer Vwwm2UifO7TwcqNZP3iHbwj4YQEudt'}) elif env=="qa": res = requests.post('http://awx.d3.'+env+'.com/api/v2/workflow_job_templates/23/launch/', verify=False, headers={'Content-Type': 'application/json','Authorization': 'Bearer g7KLZHjcW49KidF0tRy9GOOD4LMyx7'}) elif env=="stg": res = requests.post('http://awx.d3.'+env+'.com/api/v2/workflow_job_templates/33/launch/', verify=False, headers={'Content-Type': 'application/json','Authorization': 'Bearer srP31StsVBtPEmgherdWhN5FZdVlh0'}) elif env=="prod": res = requests.post('http://awx.d3.com/api/v2/workflow_job_templates/69/launch/', verify=False, headers={'Content-Type': 'application/json','Authorization': 'Bearer jJPJQH1qjT5jugy9nRW7c6GjAuu32L'}) else: print("Please choose [dev, qa, stg, prod] ^^") except: print("----------------------------------------------------") print("Need a Arguments [dev, qa, stg, prod]") print("----------------------------------------------------") print("Example : $ python launch_sync_workflow_job.py dev") print("Example : $ python launch_sync_workflow_job.py qa") print("Example : $ python launch_sync_workflow_job.py stg") print("Example : $ python launch_sync_workflow_job.py prod") print("----------------------------------------------------") - 공식 API 가이드를 통해 유용한 정보를 확인할 수 있습니다.
Cobbler
Introduce
- Cobbler는 간단한 명령으로 PXE 부팅이 가능한 물리 서버 및 가상 머신에 Linux를 자동으로 설치(Provisioning)하는 도구입니다.
- 기존 Kickstart 환경뿐만 아니라, WebUI, 외부 스크립트, API 등을 제공하며, DHCP, DNS, YUM Repository 관리 기능을 제공 합니다.
- 다양한 교육, 금융, 정부기관에서 사용하고 후원을 받고 있으며, 대표적으로 DELL과 Fedora, SUSE, Genome 등이 있습니다.
devops Friendly
Cobbler is a small and lightweight application (about 15k lines of Python code).
Cobbler's meaning
- 밀가루 반죽을 두껍게 씌운 과일 파이의 일종
- 구두 수선공
- 말도 안 되는 소리, 헛소리
Useful Link
- https://cobbler.github.io/
- https://github.com/cobbler/cobbler
- https://cobbler.github.io/blog/2012/06/21/selinux.html
VIM
Configuration for YAML
autocmd FileType yaml setlocal ai ts=2 sw=2 et
set number
set colorcolumn=1,3,5,7,9,10
set cursorcolor
Go

Introduce
Go is an open source programming language that makes it easy to build simple, reliable, and efficient software.
출처 - Go 공식 홈페이지
2009년 구글에서 개발한 프로그래밍 언어이며, 마스코트의 이름은 Gopher입니다. 전체적으로 C와 비슷하며, 여러 프로그래밍 언어의 장점을 유지하고 문제점을 해결하기 위해 만들어 졌습니다. Go를 이용하는 프로젝트는 대표적으로 Docker, Kubernetes, CoreOS, Dropbox, Netflix, OpenShift 등이 있습니다.
Install
Go Archive 에서 설치파일을 다운로드 합니다.
Extract
다운로드 받은 파일의 압축을 해제 합니다.
tar -C /usr/local -xzf go1.14.2.linux-amd64.tar.gz
Add Var
Go 실행 파일의 경로를 $PATH 변수에 추가 합니다.
/etc/profile 혹은 $HOME/.profile파일 등을 이용합니다.
export PATH=$PATH:/usr/local/go/bin
Test
테스트를 위해 간단한 소스 코드를 작성합니다.
vi test.go
package main
import "fmt"
func main() {
    fmt.Printf("hello, world\n")
}
작성한 소스 파일을 빌드하고 실행합니다.
go build hello.go
./hello
hello, world
Useful Link
- Documentation
- Youtube - The Why of Go
- A Tour of Go
- Go Wiki
DevOps
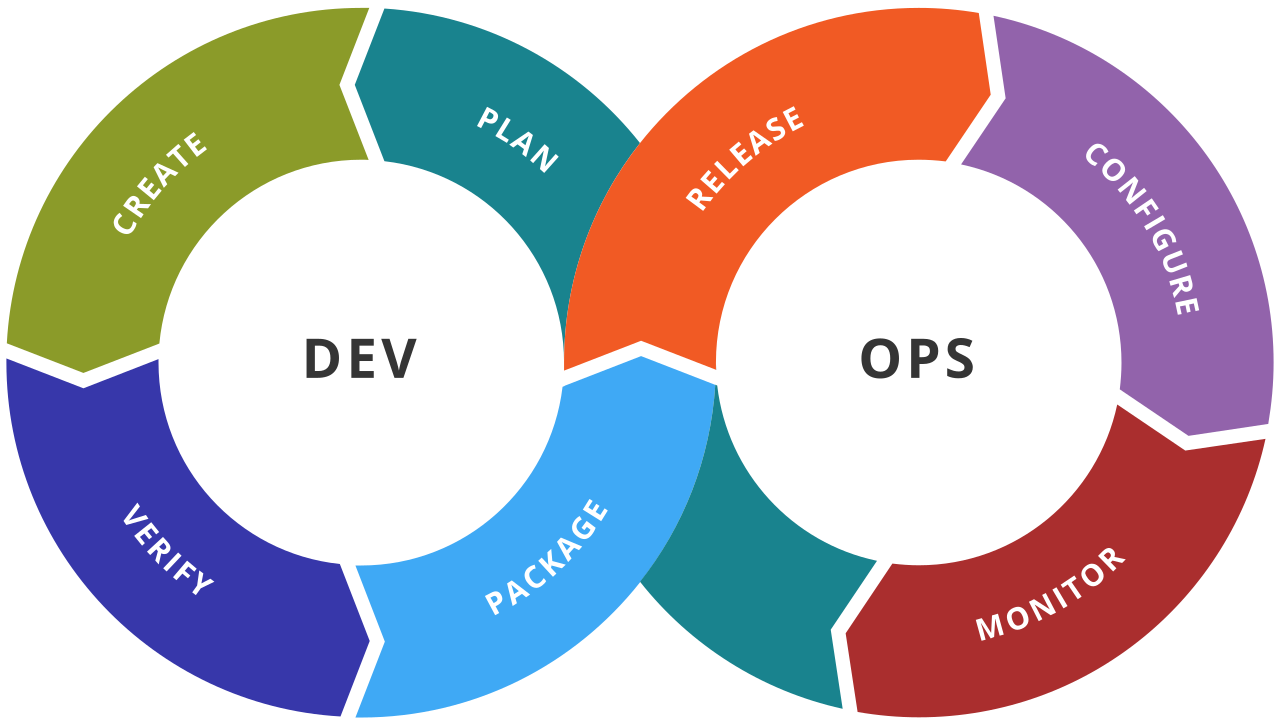
What is DevOps?
데브옵스(DevOps)는 소프트웨어의 개발(Development)과 운영(Operations)의 합성어로서, 소프트웨어 개발자와 정보기술 전문가 간의 소통, 협업 및 통합을 강조하는 개발 환경이나 문화를 말한다. 데브옵스는 소프트웨어 개발조직과 운영조직간의 상호 의존적 대응이며 조직이 소프트웨어 제품과 서비스를 빠른 시간에 개발 및 배포하는 것을 목적으로 한다.
출처 - 위키백과